Prep Time: 30-45 mins
Marinate Time: 6-12 hours
Cook time: 4-7 hours
I love a good jerky. It doesn’t matter if it is beef, elk, venison, moose, or even marlin….if you can jerky it….I will eat it (and yes…we used to make blue marlin jerky back in Hawaii…what else do you do with 400 lbs of Marlin meat????). My kids and I have a long running tradition of making Venison Jerky every year around late November. Giving Jerky as a Christmas gift goes back about 7 years with my friends and family and we also use our “Jerky Fest” as a way to free up some space in our chest freezer. Out with last years meat…and make room for the new! New Year….New Meat!
While I usually make venison jerky, I had a request this year to make some beef jerky for some friends. I spent a few minutes, wrote down the recipe, and took a few pictures to help pass this fun and easy recipe on. This is simple. You don’t have to have any cool tools, or any super culinary skills here. Just some time and some patience.

What you need (this recipe is per pound of meat, just multiply this out per pound).
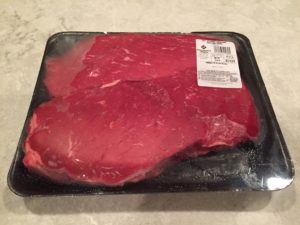
For this recipe I used some London Broil and some Bottom Round Steaks. Any “Round Roast” will do. I like the London Broil because it gives great texture and it really takes to marinating. Use whatever you have here. Truthfully, I use whatever is on sale. Just make sure you cut WITH the grain…see below.
What You Need
½ Tablespoon of Curing Salt per pound of sliced meat.
2 Tablespoons of cold water.
1 Tablespoon of Worcestershire Sauce.
1 Tablespoon of Soy Sauce.
1 Teaspoon of honey.
2 Teaspoons of freshly ground black pepper.
2 Teaspoons of garlic powder.
2 Teaspoons of onion powder.
½ Teaspoon of red pepper flakes.
½ Teaspoon of smoked paprika (use plain paprika if you don’t have the smoked).
½ Teaspoon of liquid smoke.
You can add a pinch of Brown Sugar to sweeten your marinade, or a pinch of Cayenne to spice it up (the more Cayenne…….you know…the hotter your end product).
Here we go:
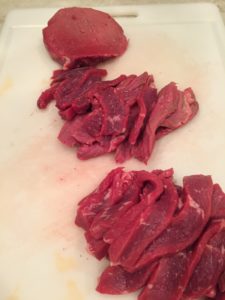
I like to put the meat in my freezer for about 2 hours before I begin making my Jerky. This helps with cutting your meat. Slightly frozen meat will be a bit “stiff” and will help you slice neat and thin.

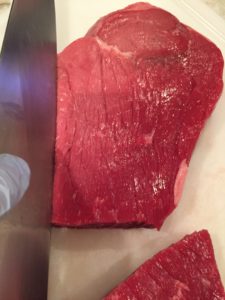
Take your meat and trim any and all visible fat. If you are working with venison or elk there will not be as much fat as store purchased beef. If you see Silver Skin on your meat, you know…cut that off too.
Next take the meat out of the bag and slice thinly with the grain of the meat. VERY IMPORTANT to slice with the grain.

Take all of your dry ingredients from above and mix them separately. I use a mortar and pestle to grind but you don’t have to. Place them in a bowl and mix until all ingredients seem evenly distributed.Pour all the mixed spices and your wet ingredients (water, soy, Worcestershire, honey, and liquid smoke) into the zip-lock. Mix all this up…ie. shake the bag……
You can use a bowl here instead of a zip-lock…but do not use a metal bowl. Your jerky will have a metallic taste. Always use plastic or glass….
Add all of your sliced meat to the bag, put in the fridge, and let sit overnight (or at least 6 hours). I always put the zip-lock bag in big bowl before you put in the fridge. Trust me on this. I have had a zip-lock blow out and had jerky marinade all over the fridge…..it was pretty bad. So, save yourself some pain here and put it all in a large Tupperware or bowl. Also, I move the meat around in the bag every few hours or so….just so the marinade soaks in evenly.
Ok, we will take the dehydrator path first.
Take your meat out and place evenly on the dehydrator trays. I don’t like to “pat” the meat dry…I like all the seasoning to stick right on the meat. Some people pat the meat with a paper towel, but I just don’t get this. All of that spice and pepper transfers to the towel. That is the good stuff in my opinion. Sure, it will take a bit longer to dehydrate, but the end result is much better.
Leave some space between the pieces so that the air can travel around all the meat.
Turn on your dehydrator. If you have one that allows you to set the temperature, go ahead and set for 160 degrees. My dehydrator does not have a temperature setting, so I just turn it on and let it go.
And now….we wait. Depending on our dehydrator, you could be done in about 4-6 hours. It usually takes me about 6-7 hours to get the perfect jerky texture. After about 4 hours I start to check and taste test. I also like to rotate the drying racks about every hour or two. Most dehydrators will “dry” or “cook” the meat on the bottom racks faster. So just move them around a bit. I also like to flip the meat about half way through. You should be able to see the “grid marks” after flipping. I feel that this helps overall with your drying time.
The one thing you need to remember is that the meat will cook with the slow heat of the dehydrator all the while drying out and curing. 160 is the magic temperature. You do not want anything over that temperature…or you are just cooking your meat.
If you are using an oven, don’t worry! Ovens work great for Jerky! Some ovens have a dehydrate setting. If you have this setting…you are good to go. If not, no worry! Use the convection setting. If you don’t have that, just set your oven at 175 degrees.
First, layer some foil on the bottom rack to catch your drippings.
Spray your “clean” cooking racks with some non-stick cooking spray.
Use separate cooking racks if you have them (check these cool racks from Cabelas), if not you will be laying the meat directly on the oven racks. Leave some space between each piece.
Now I set the oven at about 175 degrees and leave the door open a crack to let air get out.
If your oven will not let you set the temp at 175, just set it as low as it will allow.
I start checking and tasting after about 1 ½ hours of cooking time. Be careful here, check every 30 minutes and pull your jerky when you feel the texture is just how you like it.
I rotate the cooking racks every hour. Most ovens have “Hot Spots” and you can work around this by just moving the racks.
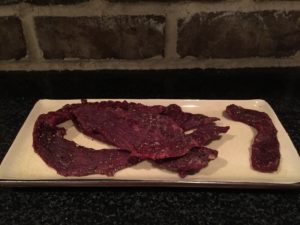
Alright! You are done! I vacuum seal the jerky in batches kind of like what you would get at the store. I like to freeze any jerky that I am not going to eat and it will hold for 3-4 months (but it never makes it that long….).

That is all there is to it! Please leave a comment below and let us know how your Jerky Experience turned out. Also follow us on Facebook, Instagram, and Twitter for more articles and recipes.
Thanks!

